No Products in the Cart


What if your wedding album wasn't just a collection of images, but a cinematic experience that felt more like a curated gallery than a simple scrapbook? It's a common struggle for many couples who find themselves paralyzed by a mountain of digital files and the technical fear of bleeds or gutters. Learning how to layout a wedding album requires a shift in perspective. You aren't just placing photos on a page. You're orchestrating a visual narrative that captures the soul of your celebration.
You likely want a finished piece that feels like a professional artifact, not a cluttered DIY project. We've designed this artisan’s guide to help you master the sophisticated art of narrative design through professional curation and visual rhythm. You'll gain the confidence to choose materials that last a century and layouts that breathe with intentional white space. We're going to walk through everything from selecting your "Hero" moments to understanding the technical precision required for a flawless, high-end finish.
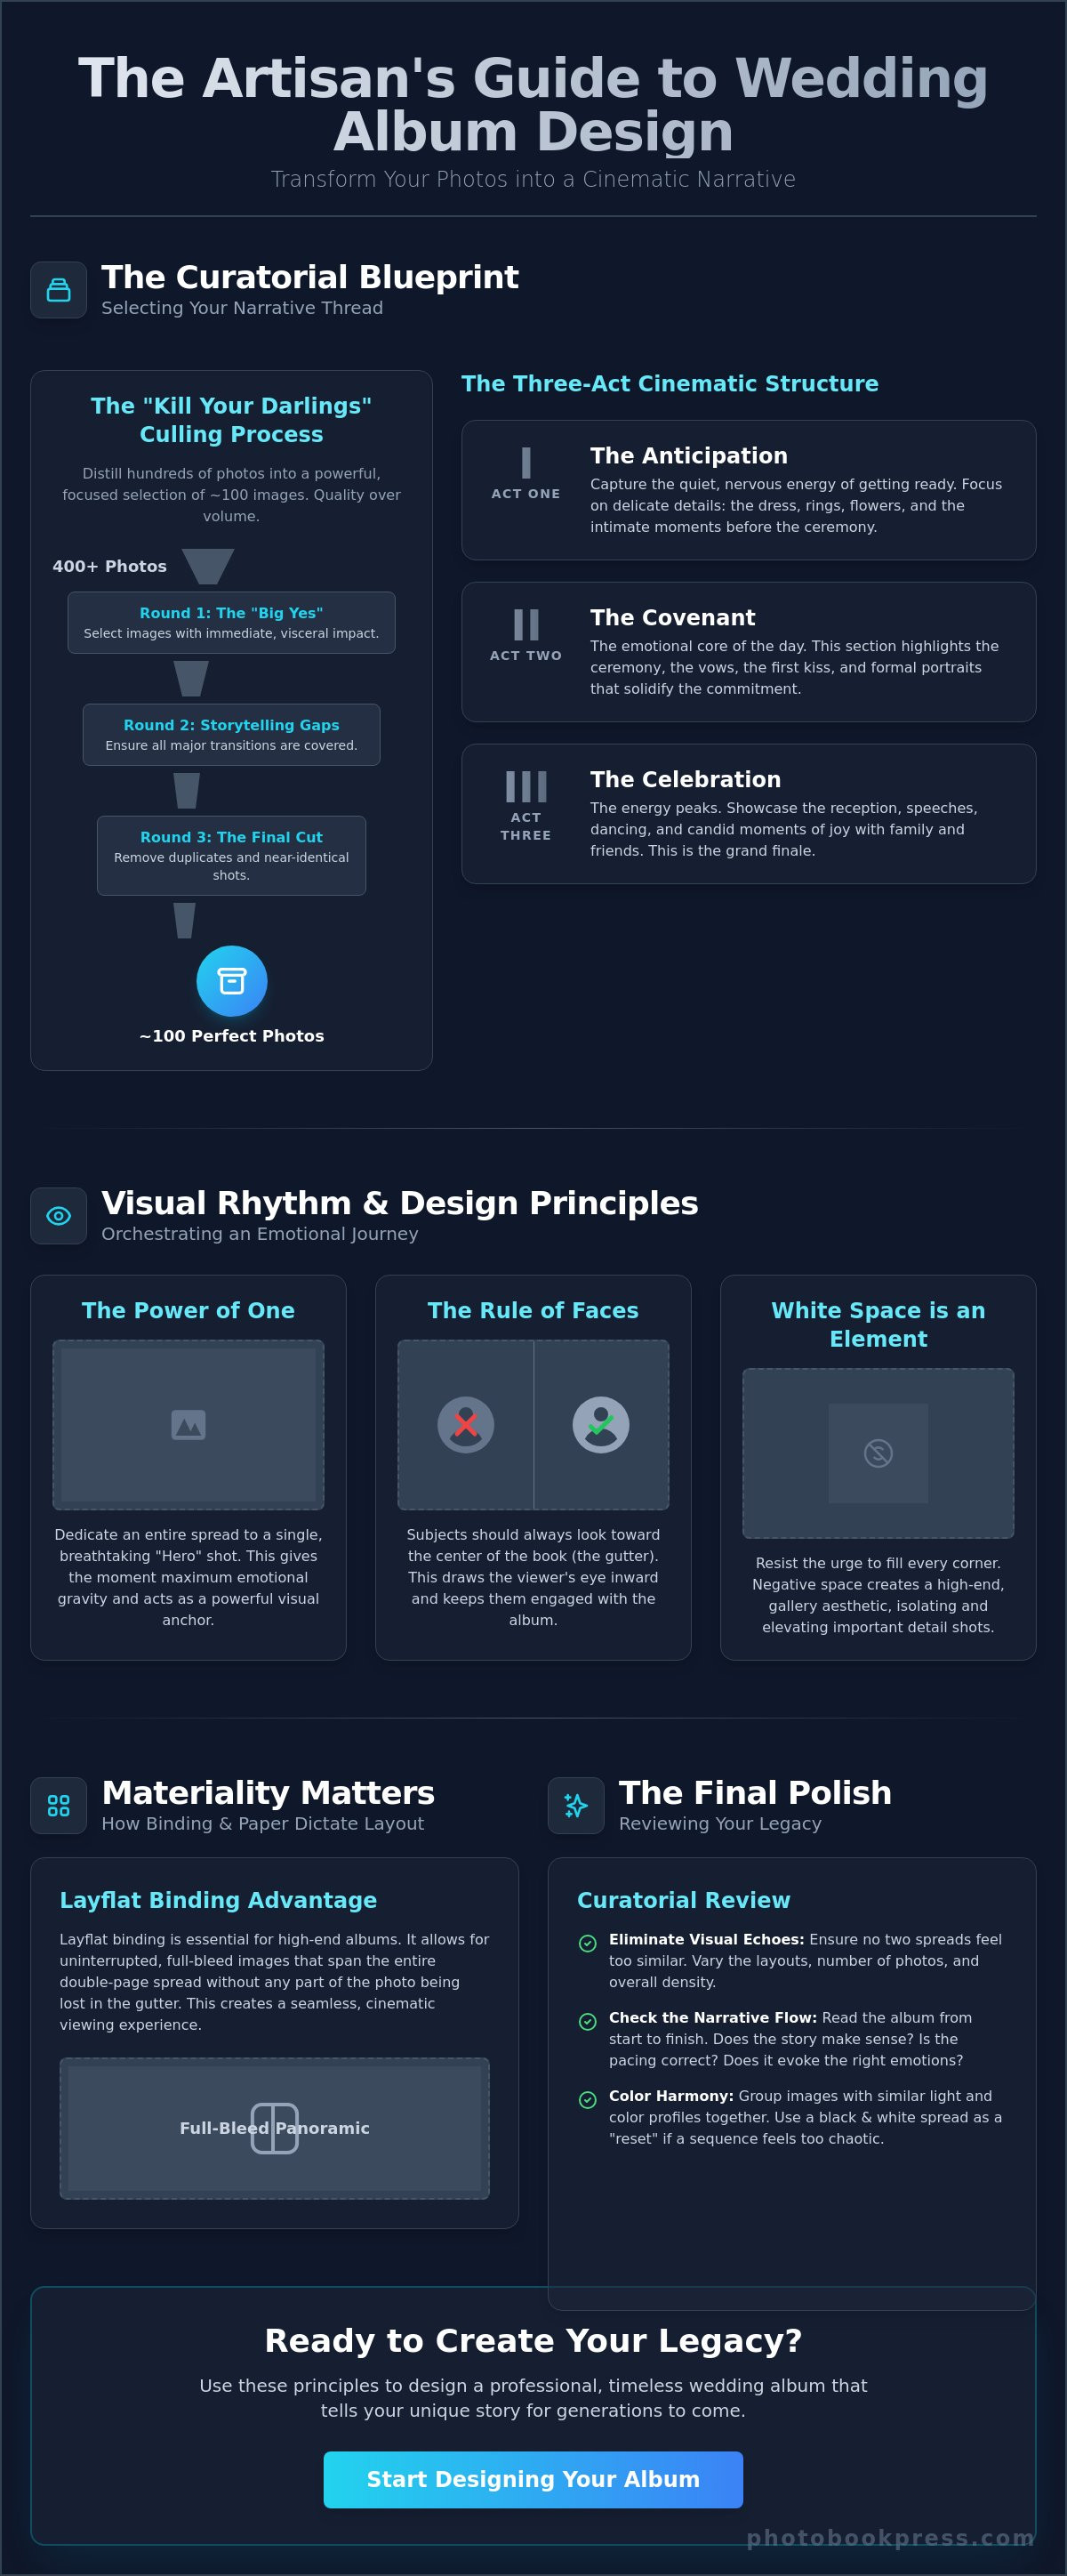
Curation is the invisible hand that transforms a folder of digital images into a timeless legacy artifact. When you begin the process of how to layout a wedding album, your primary challenge isn't technical; it's emotional. You must adopt the "Kill Your Darlings" philosophy. While your photographer likely delivered hundreds of stunning frames, an album that tries to showcase every moment ultimately showcases none of them. A meticulously curated selection of 100 perfect photos creates a focused, powerful experience that 400 mediocre ones simply cannot match. It's about quality over volume.
To better understand this concept of initial selection and design, watch this helpful video:
A successful layout relies on a clear visual hierarchy. You need to identify your "Anchor Images," those breathtaking shots that define the emotional peaks of your day. These are your "Hero" shots, often deserving of a full page or a luxurious double-page spread. Supporting shots provide the necessary context, while detail shots, like the intricate lace of a veil or the texture of a floral arrangement, act as the connective tissue. By applying standard principles of book design, you ensure that every image serves a deliberate purpose within the larger narrative arc.
Refining this selection requires a disciplined three-round culling process. Start with the "Big Yes" round, selecting images that spark an immediate, visceral reaction. The second round focuses on storytelling gaps, ensuring no major transition is overlooked. Finally, the "Final Cut" involves removing duplicates or near-identical sequences. This keeps the pacing brisk and intentional, preventing the reader from becoming fatigued by repetition.
Think of your album as a cinematic play. Act I, The Anticipation, captures the quiet, nervous energy of getting ready and the delicate details of the morning. Act II, The Covenant, focuses on the ceremony and formal portraits where the commitment is solidified. Act III, The Celebration, is where the energy peaks with the reception and candid joy. This structure ensures your album has a natural beginning, middle, and end.
Visual harmony is essential for a professional finish. Group images by their light quality and color temperature to avoid jarring clashes on facing pages. If a specific sequence feels too visually chaotic, use a black and white "reset" spread. This creates a sophisticated pause in the narrative, allowing the viewer to focus purely on the raw emotion of the moment without the distraction of competing hues.
Rhythm is the invisible pulse that guides a viewer through your story. When you master how to layout a wedding album, you aren't just placing photos; you're orchestrating a sequence of emotional beats. One of the most powerful tools in an artisan's kit is the "Power of One." By dedicating an entire spread to a single, breathtaking image, you grant that moment maximum emotional gravity. It commands silence and reflection, serving as a visual anchor that prevents the narrative from feeling rushed.
Equally vital is the "Rule of Faces." This principle dictates that subjects should always look toward the center of the book, drawing the viewer’s eye inward rather than leading it off the page. This subtle directional cue keeps the audience engaged with the physical object in their hands. Incorporating professional visual storytelling tips ensures that every compositional choice reinforces the intimacy of the day. By balancing "busy" spreads with "quiet" ones, you create a cadence that mirrors the natural flow of the wedding day itself.
Professional design is often defined by what you leave out. Negative space, or white space, is the hallmark of a high-end, gallery-inspired aesthetic. It acts as a frame, isolating and elevating delicate detail shots like the intricate patterns of lace or the glint of a wedding band. You must resist the urge to fill every corner; overcrowding leads to a "yearbook" look that diminishes the impact of your best work. Instead, maintain generous, consistent margins to give the reader’s eye a place to rest between high-energy spreads.
Order is maintained through invisible structures. Understanding how to layout a wedding album involves more than software; it requires an eye for architectural order. When placing multiple photos on a single page, ensure horizons are perfectly aligned to create a sense of calm. For reception pages where energy is high, use a strict grid system to organize candids into a cohesive collage. Visual balance is achieved when the weight of the images is distributed purposefully, whether through formal symmetry or dynamic asymmetrical arrangements.
This level of intentionality is what separates a simple photo book from a true heirloom. To see these principles in action, consider starting your project with a bespoke leather photobook that provides the premium canvas your memories deserve.
Architecture is the physical manifestation of your story. When considering how to layout a wedding album, you must view each spread as a chapter in a cinematic narrative. A successful design doesn't just present images; it moves the viewer through time and emotion with a deliberate pace. This process begins with the opening spread, which serves as your "Once upon a time." Set the tone by choosing a wide-angle shot of the venue or a meticulously styled detail of your invitation suite. This initial page should establish the setting and the aesthetic mood before the human drama unfolds.
As the story progresses, you'll encounter emotional peaks that require significant visual real estate. These are your Hero Spreads. Reserve the expansive, uninterrupted landscape of a full layflat spread for your most iconic moments, such as the first kiss or a breathtaking sunset portrait. To prevent the reader from feeling overwhelmed, integrate "breather" pages between high-energy events. A single, quiet portrait or a minimal detail shot acts as a visual palate cleanser, allowing the weight of the previous chapter to settle before you transition from the ceremony to the celebration.
The journey concludes with the closing spread. This final image should provide a sense of resolution and lasting impression. Whether it’s a quiet moment of reflection at the end of the night or a grand exit through a tunnel of sparklers, the final page is the lasting note of your legacy artifact. It's the visual "happily ever after" that stays with the viewer long after the book is closed.
While grand gestures define the day, the micro-moments provide the soul. Weave candid glances and guest reactions into the main narrative to add layers of authenticity. Use a "Detail Cluster" to group smaller elements like rings, florals, and shoes on a single spread. This technique prevents these smaller images from getting lost while creating a rich tapestry of the day’s textures. Don't overlook the "In-Between" moments, such as the quiet walk to the ceremony or a private embrace; these often carry the most profound emotional weight.
The reception requires a shift in design energy. For the dance floor, "film strip" layouts work beautifully to capture the motion and kinetic energy of the celebration. Balance these high-action sequences with the quiet, dignified moments of the toasts. When arranging family photos, use a clean grid system to keep the layout organized and respectful. This allows you to include essential group shots without compromising the sophisticated, gallery-inspired aesthetic of the rest of the album.
The physical construction of your heirloom is not an afterthought; it's the very foundation of how to layout a wedding album. A master artisan understands that the choice of binding and paper weight dictates the spatial possibilities of every page. Standard bookbinding often creates a "gutter," a deep fold where the pages meet the spine, which can swallow details or distort faces. In contrast, premium wedding albums utilize a construction that allows every spread to remain perfectly flat when opened, removing the traditional limitations of the center fold.
This technical freedom allows for the "Full-Bleed" spread, where an image runs entirely off the edge of the paper. It creates an immersive, modern feel that makes the viewer feel as though they are stepping back into the moment. The choice of paper texture also plays a vital role in image clarity and the overall mood of the spread:
The exterior of the book, whether it's wrapped in Italian leather, refined linen, or a custom hardcover, sets the emotional expectation before the first page is even turned. A leather-bound volume suggests a sense of permanence and traditional luxury, while linen offers a contemporary, tactile warmth. Each material choice should reflect the aesthetic of the wedding itself, creating a cohesive experience from the shelf to the final spread.
When you choose layflat photo books, you gain the freedom to center your subjects directly across the middle of the book. Because there is no loss of image in a traditional gutter, a panoramic portrait can span two full pages without interruption. This is the gold standard for wedding photography, as it allows for grand, cinematic compositions. Thick, archival-grade paper further enhances this experience, providing a sturdy, tactile weight that ensures the pages won't warp or degrade over the next century.
Precision in design requires an understanding of the "Safe Zone." This is the area within the page margins where essential elements, such as text or the eyes of your subjects, must remain to avoid being cut during the trimming process. While full-bleed images are visually stunning, they require a meticulous eye to ensure no critical part of the narrative thread is lost at the edge. Understanding how to layout a wedding album with these technical boundaries in mind ensures a professional result that feels intentional rather than accidental.
To experience the intersection of archival quality and narrative design, explore our collection of premium wedding albums and photobooks today.
The transition from a digital design to a physical artifact is a moment that requires absolute precision. After the intense creative effort of learning how to layout a wedding album, the most critical step you can take is to step away. The "Fresh Eyes" review is a mandatory pause in the artisan’s process. By distancing yourself from the project for at least 24 hours, you break the cycle of visual fatigue. This allows you to return with a sharpened perspective, making it much easier to identify "visual echoes"—those subtle instances where near-identical frames or redundant angles appear on separate spreads, diluting the impact of your narrative.
During this final review, perform what we call an emotional proofread. Beyond the technical alignment of horizons and margins, you must ask if the cadence of the book still makes you feel the weight of the day. A professional layout should feel like a cinematic journey that breathes with the same life as the celebration itself. If a particular spread feels overcrowded or lacks the quiet dignity established in earlier chapters, don't be afraid to make a final edit. It's better to have a slightly shorter book that maintains a flawless narrative thread than a longer one that feels repetitive.
Precision is the signature of high-end craftsmanship. Before you commit to the final click, you must verify that every image is print-ready. This involves a meticulous sweep for technical errors that a screen might hide. Ensure your resolution is set for large-format excellence; images should ideally be 300 DPI to maintain sharpness when transferred to archival paper. Check for typos in dates, names, and location captions, as these small details are the most common oversights. Finally, verify that color profiles are consistent across facing pages to prevent jarring shifts in tone that can break the viewer's immersion.
The work you've invested in mastering how to layout a wedding album can serve as the foundation for a larger family legacy. Many couples choose to create smaller "Parent Albums" as gifts, utilizing the primary layout while perhaps adjusting the scale for a more intimate feel. Choosing professional wedding albums is a commitment to multi-generational preservation, ensuring your story survives long after digital formats have faded. When you are ready to transform your digital spreads into a physical masterpiece, selecting a partner for custom photobook printing ensures that the tactile quality of the leather, linen, and paper matches the artistry of your design.
Transitioning from a vast collection of digital images to a singular physical volume is a journey of deep intentionality. You've mastered the sophisticated principles of how to layout a wedding album by embracing the power of curation, the rhythmic flow of cinematic spreads, and the technical grace of layflat design. Every choice made, from the alignment of horizons to the selection of archival matte paper, serves a single purpose. You're ensuring your story remains as vivid and emotionally resonant in fifty years as it was on the day itself.
Since 1985, we've dedicated ourselves to the noble craft of heritage print quality. Each of our albums is hand-bound in Maryland using only the finest archival-grade materials to ensure longevity. Our seamless layflat binding allows your most breathtaking panoramic spreads to flow uninterrupted, creating a sensory experience that digital screens simply cannot replicate. Your memories are precious artifacts that deserve the highest level of care and artistic precision.
Begin Crafting Your Heirloom Wedding Album
We're honored to be your partner in this creative process. Together, we'll transform your personal history into a masterpiece that will be cherished for generations to come.
Aim for approximately 80 to 120 images for a standard 36-page heirloom. Including too many photos can lead to a cluttered aesthetic that diminishes the emotional weight of your best shots. It's often better to let a single, breathtaking moment breathe than to squeeze four smaller ones onto a single page. This restraint ensures your most precious memories remain the clear focus of every spread.
A 12x12 inch square format is the gold standard for primary wedding albums. This size provides ample surface area for grand, panoramic spreads while maintaining a balanced weight in your hands. For a more understated or modern feel, a 10x10 inch album offers a compact yet premium alternative that still feels like a significant artifact without the larger physical footprint.
Organizing your story chronologically is the most intuitive way to relive the day. However, you should focus on the emotional narrative arc rather than a strict minute-by-minute log. Grouping photos into acts, such as the quiet anticipation of the morning or the high energy of the reception, creates a cinematic flow that feels intentional and curated for the viewer.
A layflat album uses a specialized binding technique that allows the book to remain perfectly flat when opened. This is the preferred choice for how to layout a wedding album because it removes the traditional gutter. Without a deep fold in the center, you can place subjects directly in the middle of a spread for a seamless, panoramic experience that captures every detail.
Maintain a minimum of 0.5 to 1 inch of white space around your images to create a gallery-inspired look. This negative space acts as a silent frame, directing the viewer’s focus to the artistry of the photograph. Resisting the urge to fill every corner prevents your design from feeling like a crowded scrapbook. It ensures a sophisticated, timeless finish that mirrors the quality of a museum collection.
You can mix both, but it's most effective to dedicate entire spreads to either black and white or color. Mixing them on a single spread can often feel visually jarring and may distract from the emotional tone you've established. Using a black and white spread acts as a sophisticated visual reset, highlighting raw emotion between more vibrant, colorful chapters of your day.
The most frequent errors include overcrowding pages with too many small photos and ignoring the safe zone near the trim lines. Overcrowding disrupts the visual rhythm and makes it difficult for the eye to find a place to rest. When you are learning how to layout a wedding album, always keep critical elements like faces and text away from the edges to ensure nothing is lost during production.
Select a cover material that reflects the tactile and visual aesthetic of your wedding day. Genuine leather suggests a sense of permanence and traditional luxury, making it ideal for classic ceremonies. Linen offers a softer, contemporary warmth that pairs beautifully with outdoor or minimalist weddings, providing a sensory introduction to the narrative within before the first page is even turned.