No Products in the Cart


A true heirloom is not merely a collection of images; it's a carefully curated gallery that honors your most significant milestones through the quiet precision of print. You've likely felt the frustration of opening a finished volume only to find cherished faces obscured by a tight binding or vibrant memories dulled by insufficient resolution. These common photo book design mistakes often occur when the ease of digital capture meets the complex technical demands of high-end manufacturing.
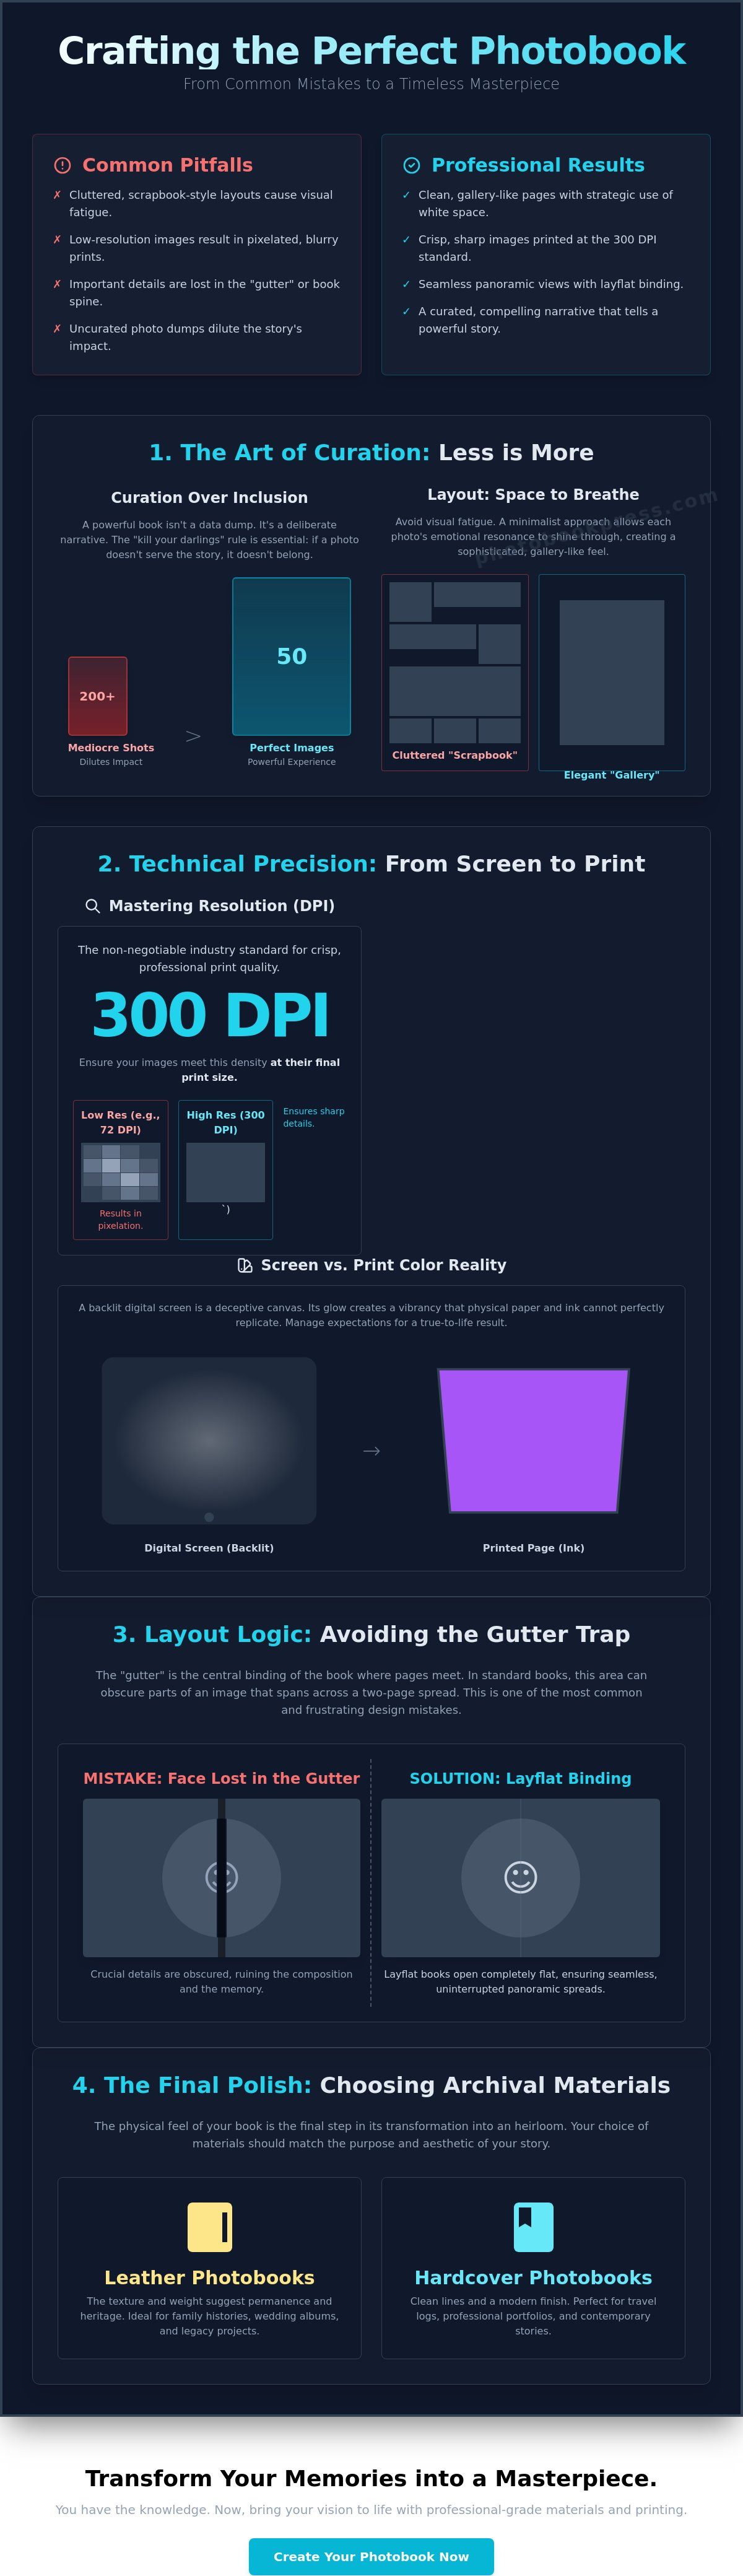
You deserve a physical record that mirrors the weight of your experiences. We'll show you how to transition from amateur layouts to sophisticated, archival-quality compositions that feel at home on the finest coffee tables. This guide explores the essential principles of professional design, from mastering the 300 DPI standard for crisp imagery to understanding how layflat binding preserves the integrity of your panoramic views. By the end, you'll have the technical confidence to ensure your next project is a masterpiece of both art and personal history.
A digital gallery is often a chaotic repository of every moment captured; yet, a physical heirloom requires the steady hand of a curator. One of the most common photo book design mistakes is treating the printed page like an infinite digital scroll. A professional-grade volume isn't a dump of data. It's a deliberate narrative. Before you select your first image, you must establish a design thesis. This singular focus ensures that every page serves the overarching story you intend to tell, providing a sense of purpose that guides the viewer through your memories.
To elevate your project from a basic collection to a sophisticated artifact, you must embrace the foundational principles of book design. This involves understanding the psychological weight of a well-paced visual narrative. A dense, cluttered layout causes visual fatigue. Conversely, a minimalist approach allows the viewer to linger on the emotional resonance of a single frame. This deliberate tempo reflects the care taken in the manufacturing process itself, suggesting that excellence requires time and attention to detail.
To better understand the pitfalls of the design process, watch this helpful video:
Identify your theme early. A collection of Wedding Albums demands a different aesthetic than a professional portfolio. This purpose dictates your material choices. For instance, a legacy family history might find its home in Leather Photobooks, where the texture suggests permanence and heritage. A modern travel log might suit the clean lines of Hardcover Photobooks. Your anchor images should be those that evoke the strongest emotional response, acting as the visual foundation for each chapter of your story.
Curation is the art of exclusion. Professionals follow the "kill your darlings" rule; if a photo doesn't advance the narrative, it doesn't belong in the book. Inclusion for the sake of completion is one of the common photo book design mistakes that dilutes the impact of your best work. Fifty perfect, high-resolution images create a far more powerful experience than two hundred mediocre ones. Look for images that speak to each other across a spread, creating a dialogue of color or emotion. Avoid repetitive shots that clutter the layout. Choose the single frame that captures the essence of the moment. This restraint is what separates a masterpiece from a mere scrapbook.
The digital screen is a deceptive canvas. It glows with a backlit vibrancy that physical paper cannot replicate, leading many creators into common photo book design mistakes before they even reach the printing stage. While a digital file feels infinite and malleable, a printed page is a final, tactile artifact governed by the physics of light and ink. Transitioning your work from the glow of a monitor to the permanence of an heirloom requires a shift from visual intuition to technical precision.
Resolution is perhaps the most misunderstood element of this process. A photo that appears crisp on a smartphone often lacks the data density required for high-quality manufacturing. Social media platforms apply aggressive compression that strips away the fine details of your images, leaving behind artifacts that become glaringly obvious when enlarged. To avoid a blurred or pixelated finish, you must look beyond what is visible on your screen and interrogate the underlying data of your files.
The industry standard of 300 DPI remains the non-negotiable benchmark for professional print quality. This density ensures that every subtle texture, from the grain of a landscape to the delicate lace of a garment, remains sharp and defined. Before uploading files to a photo book maker, verify that your images meet this requirement at their final print size. Don't fall into the trap of upscaling small images. Artificially increasing a file's dimensions doesn't add detail; it merely stretches existing pixels, resulting in a soft, muddy appearance that betrays the quality of your project.
Achieving visual fidelity requires a disciplined approach to color management for print. Most digital devices capture and display images in an RGB color space, yet the printing process relies on sophisticated ink sets that interpret these colors differently. If your monitor's brightness is set too high, your printed photos will likely return looking significantly darker and less vibrant than you intended. This discrepancy is one of the common photo book design mistakes that can ruin the emotional resonance of a carefully planned spread. Pay close attention to skin tones, ensuring they remain natural and consistent across the entire volume.
Avoid the temptation of "auto-enhance" features found in many basic design tools. These algorithms often apply heavy-handed contrast and saturation that strip away the nuanced editing you've worked hard to achieve. Instead, prioritize a unified chromatic palette. A spread featuring a warm, golden-hour portrait next to a cool-toned, blue-tinted candid creates a jarring visual break that disrupts the viewer's immersion. Consistency in lighting and color temperature is the invisible thread that binds a professional narrative together. For those seeking the highest level of craftsmanship, utilizing a premium design platform ensures your technical settings align with artisanal standards from the very first page.
Sophistication in design isn't defined by how much you can fit on a page, but by how much you can gracefully leave out. One of the most common photo book design mistakes involves overcrowding spreads with too many competing images, which inadvertently creates a frantic, "scrapbook" feel. Professional layout design relies on a strategic arrangement of text and imagery to guide the viewer's eye through a logical narrative. By utilizing a grid system, you establish a sense of order and rhythmic flow that feels intentional rather than accidental.
Before you commit to a layout, you must respect the physical constraints of the printing press. The "Safe Zone" is your visual insurance, ensuring that essential elements like faces or meaningful text aren't trimmed away during the final binding process. Similarly, "Bleed" allows your images to extend to the very edge of the paper, creating a seamless, high-end appearance. Ignoring these technical margins is a frequent pitfall that results in awkward crops or unintended white slivers at the page edges, breaking the spell of a premium product.
Traditional binding often creates a "gutter," a central fold where significant details can vanish or become distorted. This is particularly frustrating for group shots or expansive landscapes where the focus falls in the center. Choosing layflat photo books effectively eliminates this lost-in-the-fold problem. Layflat binding is a seamless 180-degree visual experience. This construction empowers you to design across the entire spread, turning a two-page layout into a singular, breathtaking panoramic canvas that remains perfectly flat when opened.
White space, or negative space, is the secret ingredient of every iconic coffee table book. It isn't "empty" space; it's a deliberate design choice that gives your photography room to breathe and command attention. Consistency in your margins is a primary hallmark of professional craftsmanship, signaling a meticulous attention to detail. While "full bleed" images offer maximum emotional impact for your most powerful shots, they should be used sparingly to punctuate the narrative. When you balance these bold moments with quiet, well-margined pages, you avoid the common photo book design mistakes that lead to overwhelming visual clutter. Consider these elements as the frame for your art:
A legacy is not merely a sequence of events; it's a curated experience that requires a deliberate narrative thread. While previous sections focused on the technical foundations of resolution and layout, the way you pace your story determines the emotional resonance of the final artifact. One of the most common photo book design mistakes is the inclusion of excessive visual noise, such as digital stickers, borders, and clip art. These elements often feel "cheap" and distract from the primary focus: your photography. A professional heirloom relies on the quiet strength of its images, not the synthetic decorations surrounding them.
Every spread should center around a "Hero Image." This is the focal point that captures the viewer's attention before they explore secondary details. Without a clear hierarchy, the eye wanders aimlessly, and the impact of your best work is lost in a sea of equal-sized thumbnails. Establishing a visual anchor allows the reader to absorb the significance of a moment before moving through the rest of the story.
Rhythm is essential for a compelling volume. You should alternate between intimate detail shots, such as the texture of a bridal veil or the clasp of a hand, and expansive, wide-angle vistas. This variety prevents visual monotony and keeps the viewer engaged. Breather pages, featuring a single small image surrounded by generous margins, act as a pause, highlighting significant milestones. When designing professional wedding albums, think of the book as having a clear beginning, middle, and end. This structure ensures the narrative flows logically, building toward an emotional conclusion rather than ending abruptly.
Typography should be treated with the same reverence as the imagery. Select archival-appropriate fonts that won't look dated in a decade. Serif fonts often suggest a classic, timeless elegance, while clean sans-serifs offer a modern, minimalist appeal. A frequent error is placing text over busy image areas, which compromises legibility and ruins the composition. Use captions sparingly; they should complement the narrative, providing necessary context without competing with the visual art. For images that include text, the industry standard recommends a resolution of 400 DPI to ensure the characters remain sharp and legible in print. If you're ready to transform your memories into a sophisticated narrative, begin your design journey with our professional-grade tools.
The final stage of creation is where your digital vision finally takes a physical form. This transition is delicate. One of the most common photo book design mistakes is treating material selection as an afterthought rather than a core design element. The texture of the paper and the weight of the cover are the first things a reader experiences; they set the emotional tone before a single page is turned. Selecting a finish that clashes with your photography style can undermine even the most meticulous layout.
Lustre paper is a favorite for its versatility. It offers a subtle pearl-like texture that enhances color saturation and contrast without the distracting glare of high-gloss finishes. It's particularly effective for vibrant travel logs or family portraits. Conversely, Matte paper provides a deeply sophisticated, non-reflective surface. This finish is the definitive choice for black-and-white photography or minimalist art portfolios, as it allows the viewer to focus entirely on the composition and depth of the image.
The longevity of your heirloom depends on the integrity of the materials used. High-end photo printing services prioritize archival quality, utilizing acid-free paper to prevent yellowing or fading over the decades. For hardcover books, a paper weight of 200gsm is often the standard for a premium, substantial feel. The cover material itself serves as the protector of your legacy. Leather Photobooks exude a sense of timeless prestige, while linen offers a more organic, contemporary aesthetic. Each choice should reflect the weight of the occasion you're preserving.
Before you commit to the press, a meticulous final walkthrough is essential. Screen-based proofing can miss small errors that become permanent once printed. It's often wise to order a single copy to verify color accuracy and binding tension before ordering a large run. Use this checklist to ensure your project is flawless:
Ready to begin your legacy? Start your custom photo book design with Photobook Press today.
Designing a professional-grade heirloom is a profound journey from digital convenience to physical artistry. By prioritizing thoughtful curation and technical precision, you ensure your most precious memories are preserved with the dignity they deserve. We've explored how mastering resolution, respecting the physical margins of the page, and choosing archival materials transform a simple project into a gallery-quality volume. Avoiding these common photo book design mistakes allows your personal narrative to shine without the distractions of cluttered layouts or technical flaws. It's about more than just printing photos; it's about investing in a legacy that will be felt as much as it is seen.
Your story deserves a home that reflects its significance. At Photobook Press, we've been hand-crafting volumes in Maryland since 1985, utilizing professional-grade archival materials to ensure your history remains vibrant for generations. Whether you're utilizing layflat binding for seamless panoramic spreads or selecting the perfect leather cover, our commitment to craftsmanship matches your passion for storytelling. Design Your Custom Heirloom with Photobook Press and turn your vision into a tactile masterpiece that you'll be proud to share for years to come.
The most frequent error is overcrowding pages with too many images, which dilutes the emotional impact of individual photos. This often coincides with ignoring technical "Safe Zones," leading to faces or text getting trimmed during the binding process. By favoring curation over inclusion, you avoid the cluttered aesthetic that defines many common photo book design mistakes. A professional heirloom requires white space to allow each image to breathe and resonate.
High-quality printing requires a minimum resolution of 300 DPI at the intended physical size of the image. You can verify this by checking the pixel dimensions of your file; for a 10-inch print, your image should be at least 3,000 pixels wide. Images sourced from social media or text-heavy graphics, which often require 400 DPI, may appear soft or pixelated if they don't meet these data-rich benchmarks.
Choosing between a template and a custom layout depends on your design confidence and the complexity of your narrative. Professional templates offer a balanced, rhythmic structure that ensures consistency in margins and alignment. A custom layout, however, allows you to break the grid for dramatic "Hero Images" or unique panoramic spreads. Both approaches can yield a sophisticated result if you maintain a disciplined focus on minimalism and visual hierarchy.
Bleed refers to the small margin of your image that extends past the final trim size of the book. This technical requirement is vital because it prevents thin, unintended white slivers from appearing at the edges of "full bleed" images. By designing with bleed in mind, you ensure a seamless, professional finish where the photography appears to flow off the page without interruption, maintaining the boutique exclusivity of your project.
Matte finishes offer a sophisticated, non-reflective surface that is ideal for black-and-white photography or fine art portfolios. Glossy finishes provide high contrast and vibrant color saturation, though they are prone to glare and fingerprints. For a versatile, artisan feel, many curators prefer a lustre finish. Lustre combines the richness of gloss with the subtle, fingerprint-resistant texture of matte, making it a definitive choice for archival-quality volumes.
A professional look is typically achieved by featuring one dominant "Hero Image" per spread, occasionally supported by one or two detail shots. Overloading a single page is one of the most common photo book design mistakes, as it creates visual noise and exhausts the viewer. By restricting the number of images, you elevate each frame to a work of art. This ensures the narrative remains clear, impactful, and deeply resonant.
Layflat binding utilizes a specialized construction that allows pages to remain perfectly horizontal when the book is open. This eliminates the "gutter trap" found in standard binding, where portions of an image are swallowed by the central fold. Layflat volumes are the preferred choice for panoramic photography; they provide a seamless 180-degree viewing experience across a two-page spread without any loss of detail or visual distortion.
Modern smartphone sensors are capable of capturing high-resolution images suitable for professional printing, but original file quality is paramount. You must avoid using images sent via messaging apps, as these are heavily compressed and lose critical data. For the best results, ensure your smartphone photos were taken in natural light and meet the 300 DPI threshold at your desired print size before including them in your heirloom.