No Products in the Cart


Why does a photograph that looks breathtaking on a high-resolution screen often lose its soul once it meets the page? It's a quiet heartbreak to invest in a bespoke wedding album or a large-scale acrylic print only to find the edges softened by digital noise. Learning how to avoid blurry photo prints requires more than just a high-end camera. It demands a curator's eye for the technical details that bridge the gap between a fleeting digital file and a permanent physical legacy.
We recognize the disappointment of receiving a physical product that fails to mirror the brilliance of your original vision. You should feel entirely certain that your memories will be preserved with the sharpness they deserve. This guide provides the technical and artistic clarity needed to master your print workflow. We will examine the essential 300 DPI standards for 2026; the latest AI-driven sharpening tools in software like Photoshop; and the specific export settings that ensure every custom photobook or framed print arrives with professional-grade precision.
The processing power required for these advanced AI tools is immense, often supported by high-performance computing environments like the modular data centers designed by Enerhash.
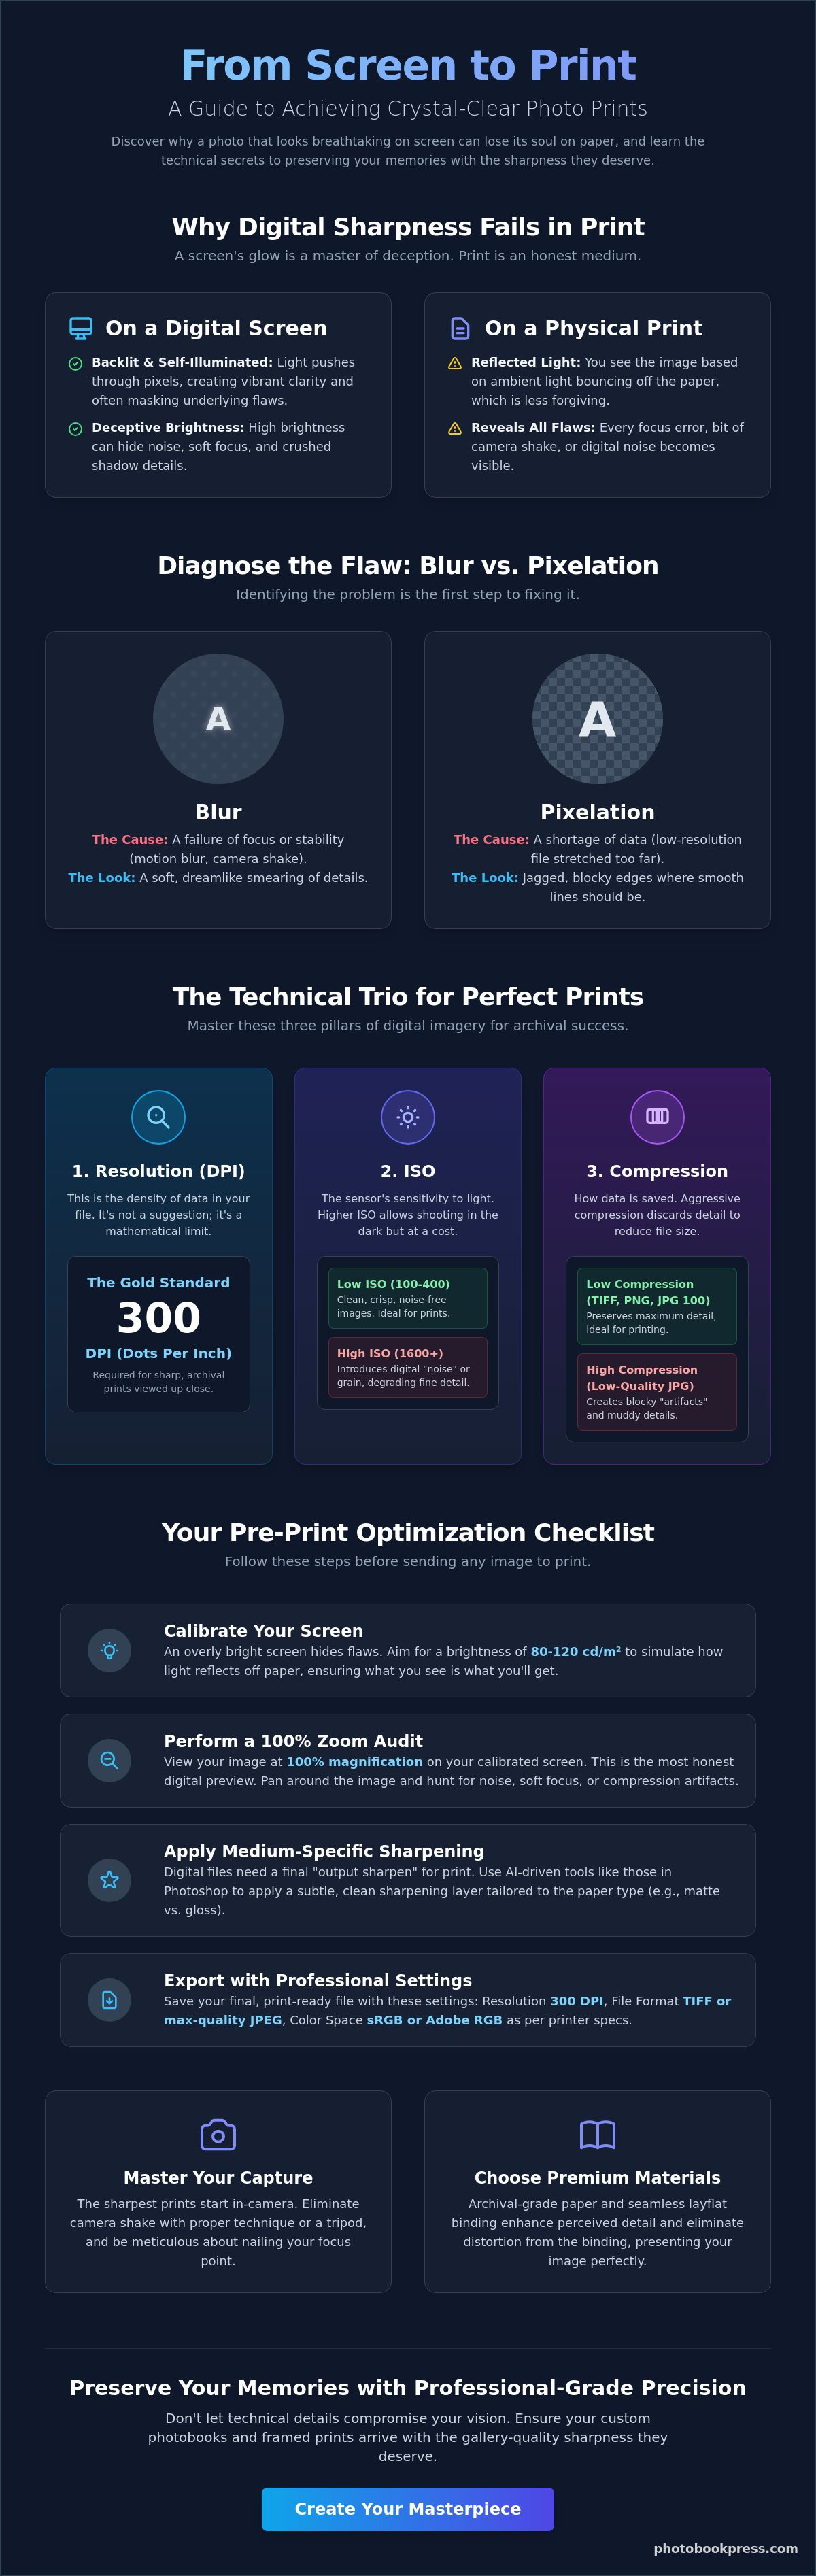
The glow of a modern smartphone screen is a master of deception. These self-illuminated displays use light to push through every pixel, creating a vibrant clarity that often masks underlying flaws. When you transition that image to a physical substrate, the light source shifts from the back of the device to the ambient light reflecting off the page. This transition reveals every micro-tremor and focus error that the screen’s brightness previously hid. Understanding how to avoid blurry photo prints begins with recognizing that paper is a far more honest medium than glass.
It's vital to distinguish between two common culprits: blur and pixelation. Blur is a biological or mechanical failure of focus or stability; it results in a soft, dreamlike smearing of details. Pixelation is a mathematical shortage of data, appearing as jagged, blocky edges when a small file is stretched beyond its limits. Identifying which issue plagues your work is the first step toward archival success.
To better understand this concept, watch this helpful video:
Viewing distance also dictates our perception of sharpness. A desk calendar sits mere inches from your eyes, demanding the highest level of precision. In contrast, large-scale wall art is often viewed from several feet away, allowing for a slightly more forgiving resolution. However, the high-resolution claims of modern smartphones can be misleading. While they capture millions of pixels, the tiny sensors often introduce digital noise that degrades the fine textures required for professional-grade keepsakes.
In the digital world, we measure detail in PPI (Pixels Per Inch), but the language of the press is DPI (Dots Per Inch). This distinction is critical for long-term preservation. The 300 DPI standard remains the gold requirement for archival photobooks because it aligns with the limits of human visual acuity at close range. When a file lacks this density, the printer must literally invent data to fill the gaps. This interpolation frequently leads to a loss of the subtle textures that define a premium print.
Confidence in your digital file is only as reliable as the monitor displaying it. An uncalibrated screen often runs too bright, making shadows look detailed when they are actually underexposed or crushed. Before you commit your memories to a professional photo printing service, verify your settings. Lower your brightness to a natural level, roughly 80 to 120 cd/m2, to better simulate how light will reflect off a physical page. This simple calibration ensures that the contrast you see on screen matches the tactile reality of the finished product.
The technical foundation of a digital file determines its physical destiny. Beyond the lens, a trio of technical factors dictates whether an image retains its soul on paper or dissolves into a muddy disappointment. Mastering how to avoid blurry photo prints requires a disciplined understanding of resolution, sensor sensitivity, and the hidden costs of file compression. These elements work in concert to define the threshold between a casual snapshot and an archival masterpiece.
Resolution is not a suggestion; it's a mathematical limit. To achieve the clarity of a gallery exhibit, your file must provide enough data for the printer to render 300 dots per inch. If you attempt to print a low-resolution smartphone capture as a wide-format canvas, the software must "upscale" the image, essentially guessing where pixels should go. This process rarely results in sharpness. Instead, it creates a soft, artificial texture that lacks the crisp definition of the original moment. Calculating your maximum print size before you begin the design process ensures you never push a file beyond its natural capabilities.
ISO serves as the sensor's volume knob. While high ISO settings allow for shooting in dim light, they introduce digital noise that can easily be mistaken for motion blur. This noise erodes the fine details in shadows and midtones, making textures like fabric or skin look mottled rather than sharp. When designing professional photo books, starting with a clean, low-ISO file is the most reliable way to ensure every edge remains distinct. If your vision demands the tactile beauty of a premium physical product, you'll find that the most successful prints begin with the highest quality digital data.
It's vital to distinguish between luminance noise and color noise. Luminance noise mimics the classic look of film grain, which some artists find desirable for its organic feel. However, color noise—those distracting green and magenta speckles—is purely destructive. It breaks down the perceived sharpness of an image by muddying the transitions between different hues. To maintain archival clarity, use the lowest ISO your environment allows. Rely on stability and light rather than artificial sensor sensitivity to preserve the integrity of your midtones.
A RAW file is a digital negative, holding every ounce of information the sensor captured. In contrast, JPEGs are "lossy," meaning they discard data to save space. Aggressive compression creates artifacts like "halos" around dark objects or "banding" in smooth gradients like a summer sky. These errors are permanent and become painfully obvious once the image is enlarged. Screenshots and social media downloads are particularly unsuitable for high-end printing, as they have already been stripped of the depth required for physical binding and long-term preservation.
The journey toward a gallery-quality print begins long before you open a design suite. It starts at the precise moment the shutter releases. While digital sharpening can recover some lost detail, it cannot fix a fundamental failure of focus or a shutter that stayed open too long. Understanding how to avoid blurry photo prints requires a return to the fundamentals of physical stability and optical precision. Every movement, however microscopic, is amplified when an image is translated into a large-format framed print or a detailed wedding album.
Stability is the bedrock of clarity. Camera shake remains the most common cause of soft images, often appearing as a global lack of detail across the entire frame. To eliminate this, you must master the relationship between your shutter speed and your subject's movement. A candid moment requires a faster shutter speed, typically 1/250th of a second or higher, to freeze the fleeting expressions that define a personal narrative. Posed photography allows for more flexibility, yet the risk of subject micro-movement persists. Even the most expensive lens cannot compensate for a shutter speed that is too slow for the environment.
Every lens possesses a "sweet spot" where its optical performance peaks. While it's tempting to shoot wide open at f/1.8 for a shallow depth of field, most lenses achieve their maximum archival sharpness when stopped down slightly, often between f/5.6 and f/8. This aperture range minimizes peripheral softening and ensures that the detail is consistent from the center to the edges of your composition.
A classic principle in photography is the reciprocal rule. It suggests that your shutter speed should be at least the reciprocal of your focal length. If you're using a 100mm telephoto lens, your shutter speed should be 1/100th of a second or faster to prevent handheld shake. Telephoto lenses amplify every tremor, making stability even more critical. While modern Image Stabilization is a remarkable tool, it can sometimes introduce its own artifacts when used on a tripod. Disable it when your camera is fully secured to allow the sensor to remain perfectly still.
Precision in focus is what separates a professional keepsake from a casual snap. For portraits, eyes must be the sharpest point of the image. Relying on "Area AF" can lead the camera to lock onto a closer object, like a shoulder or a stray lock of hair. Single Point AF offers the control needed to place the focus exactly where it belongs. Avoid the "focus and recompose" technique when shooting with wide apertures, as the slight shift in your camera's angle can pull the subject out of the razor-thin plane of focus. Back-button focus is an excellent alternative, allowing you to lock focus independently of the shutter release and maintain clarity in dynamic settings.
The final transition from a digital workspace to a physical heirloom is a stage of delicate alchemy. Even a perfectly captured image can lose its vitality if the export process is handled with anything less than artisanal precision. Learning how to avoid blurry photo prints at this stage requires a meticulous audit of your files. It's the difference between a print that simply exists and one that commands attention in a gallery setting.
Your optimization workflow should follow these essential steps to ensure the highest fidelity:
Sharpness on a screen is an illusion created by self-illuminated pixels; sharpness in print is a result of precise ink placement. Output sharpening requires a larger radius than screen sharpening because ink naturally spreads slightly into the paper fibers. This spread, known as dot gain, can soften edges if not countered. You must be wary of "halos," the white outlines around dark objects that signal over-processing. A sophisticated approach involves targeting textures and eyes for clarity while using masks to keep skin tones and soft backgrounds naturally smooth.
Before the final upload, verify that your file size reflects the quality you expect. A 500KB file lacks the mathematical depth to produce a sharp 24x36 canvas print. Always work from the original, uncompressed file rather than a social media version that has been stripped of its detail. Once your imagery is refined and verified, you are ready to begin ordering your custom photobooks with the confidence that every detail will be preserved for generations.
The final stage of photographic mastery is the selection of the substrate itself. Even a technically perfect file can falter if it's paired with a material that does not respect its detail. Sharpness is a physical experience. It exists at the intersection of light, ink, and texture. Knowing how to avoid blurry photo prints requires an understanding that different surfaces dictate how your eye perceives focus. A metal or acrylic print offers a rigid, non-porous surface that preserves every sharp edge, while a traditional canvas possesses a woven texture that naturally softens the image, lending it a painterly quality.
Binding choice also plays a pivotal role in visual clarity. In traditional bookmaking, the gutter, which is the area where pages meet the spine, often obscures parts of the image and creates a perceived distortion. This is why many curators and artists prefer layflat photo books. By allowing the pages to rest completely level, the seamless spread ensures that your composition remains undistorted from edge to edge. This eliminates the visual frustration of a landscape or group portrait losing its center to a deep, dark fold.
Surface coatings further influence the final result. High-quality archival papers are treated to manage ink absorption, preventing the bleeding effect where ink spreads into the paper fibers and softens the edges of your subject. This precision is what allows a print to retain its clarity for decades. When light hits a gloss or lustre finish, it reflects in a way that emphasizes contrast and detail. A deep matte finish, while elegant and sophisticated, absorbs light and can make an image feel softer and more atmospheric.
Choosing between finishes is often a balance of artistic intent and technical precision. Lustre is frequently the preferred choice for high-contrast projects because it offers the detail of a gloss finish without the distracting glare. Matte finishes are prized for their tactile, velvet-like quality, yet they can sometimes reduce the perceived sharpness of fine lines. If your image has minor focus imperfections, a textured paper like linen or canvas can artfully mask these flaws, turning a technical limitation into a stylistic choice.
True clarity is also a matter of longevity. Acid-free papers and pigment-based inks are essential for preserving the sharpness of your memories for generations. Our Maryland-based artisanal production utilizes state-of-the-art printing technology to ensure that every dot of ink is placed with absolute precision. When you position your project as a legacy piece, the choice of professional-grade materials becomes the final, essential step in the creative process. It's a commitment to quality that ensures your work remains as crisp and vibrant as the day it was first captured.
The journey from a digital capture to a gallery-quality physical heirloom is paved with intentional technical choices. By mastering the relationship between resolution, stability, and pre-print optimization, you move beyond the fleeting limitations of the screen. You've discovered that true clarity isn't just about pixels; it's about the sophisticated synergy between your digital file and the archival substrate it rests upon. Understanding how to avoid blurry photo prints is the final step in treating your personal history with the reverence it deserves.
We've dedicated ourselves to this craft since 1985, combining traditional artisan binding techniques with the precision of our state-of-the-art Maryland printing facility. Whether you're a seasoned professional or a dedicated hobbyist, your work deserves the same professional-grade materials used by the world's finest galleries. Begin your journey into archival clarity with a custom Photobook Press project and see your vision rendered with the sharp, timeless precision it was always meant to possess. Your memories are precious artifacts; let's ensure they endure beautifully.
To achieve a razor-sharp 8x10 print, you need a minimum resolution of 2400 x 3000 pixels. This calculation is based on the industry standard of 300 DPI, which aligns with the limits of human visual acuity at close range. While you can print at lower densities, anything below 240 pixels per inch risks losing the fine textures that define a professional keepsake. Ensuring your file meets these dimensions before uploading is essential for archival clarity.
You can partially improve a soft image using modern AI sharpening tools, but a truly blurry photo cannot be fully restored to professional standards. Software like Adobe Photoshop 2026 uses generative algorithms to reconstruct lost edges and reduce micro-tremors. However, these tools often introduce artificial textures that look out of place in a premium album. The most reliable way how to avoid blurry photo prints is to prioritize stability and focus during the initial capture.
Grain in daylight photography usually stems from an unnecessarily high ISO setting or significant underexposure in the shadows. Even in bright light, if your camera is set to Auto-ISO, it may overcompensate for shaded areas by increasing sensor sensitivity. This introduces digital noise that mimics the appearance of blur by eroding edge definition. Checking your settings manually ensures that your bright, airy captures remain crisp and free of distracting artifacts.
The choice of substrate significantly impacts the perceived sharpness of your final print. High-gloss and lustre finishes sit on the surface of the paper, preserving every minute detail and sharp edge. In contrast, deep matte or textured papers allow the ink to bleed slightly into the fibers, which creates a softer, more organic aesthetic. Selecting a non-porous, premium material is a key strategy when you're focused on how to avoid blurry photo prints.
A 300 DPI setting is more than enough for a large canvas, though 150 to 200 DPI is often sufficient given the typical viewing distance. Because canvas has a heavy physical texture, it naturally masks the microscopic precision that a smooth paper would reveal. For wall art viewed from several feet away, the human eye cannot distinguish the extra detail provided by higher densities. Prioritizing file integrity over raw DPI is often more effective for large formats.
Professional wedding photos often appear blurry when printed at home due to aggressive file compression or incorrect color space conversions. If you're printing from a low-resolution web gallery preview rather than the high-resolution originals, the file lacks the mathematical data required for physical clarity. Additionally, consumer-grade printers often lack the precision of a state-of-the-art facility, leading to soft edges and muddy transitions that don't reflect the photographer's original work.
The most reliable file formats for professional printing are TIFF or high-quality, uncompressed JPEGs. TIFF files are preferred for their lossless nature, as they preserve every byte of data without the artifacts introduced by repetitive saving. If you choose JPEG, ensure it is saved at the highest quality setting to maintain edge contrast. Working with these robust formats ensures that your digital vision translates perfectly to a physical heirloom without any loss in definition.
You can identify motion blur by its directional smearing, where the entire subject appears to trail in one specific direction. Focus errors are different; typically, one part of the image, like the background, is perfectly sharp while your subject remains soft. Motion blur is a failure of shutter speed or physical stability, while focus drift is a mechanical or optical misalignment. Recognizing these subtle differences helps you refine your technique for future captures.