No Products in the Cart


Last Tuesday, Julian discovered a collection of 1950s portraits fused to the yellowed adhesive of a "magnetic" album, a sight that is as heartbreaking as it is common. It's a distressing realization that your most precious artifacts are often quietly fading or becoming brittle within the very books meant to protect them. You aren't alone in the fear that a single wrong move might tear a piece of your history. Preservation is a dual act. Learning how to preserve old photos in an album isn't just about storage; it's an act of stewardship for your family’s unique narrative.
We'll guide you through the meticulous techniques used by professional conservators to rescue, restore, and rehouse these delicate prints into enduring heirloom collections. You'll discover the essential science behind archival safety, including the importance of ISO 18902:2013 standards and the Photographic Activity Test (PAT) to ensure every material is chemically inert. We also address the latest 2026 standards for LED light stability to protect your legacy from modern environmental stressors. From stabilizing physical decay to selecting premium, layflat displays that honor your heritage, this guide provides a clear path to turning a fragile box of memories into a permanent, beautiful legacy.
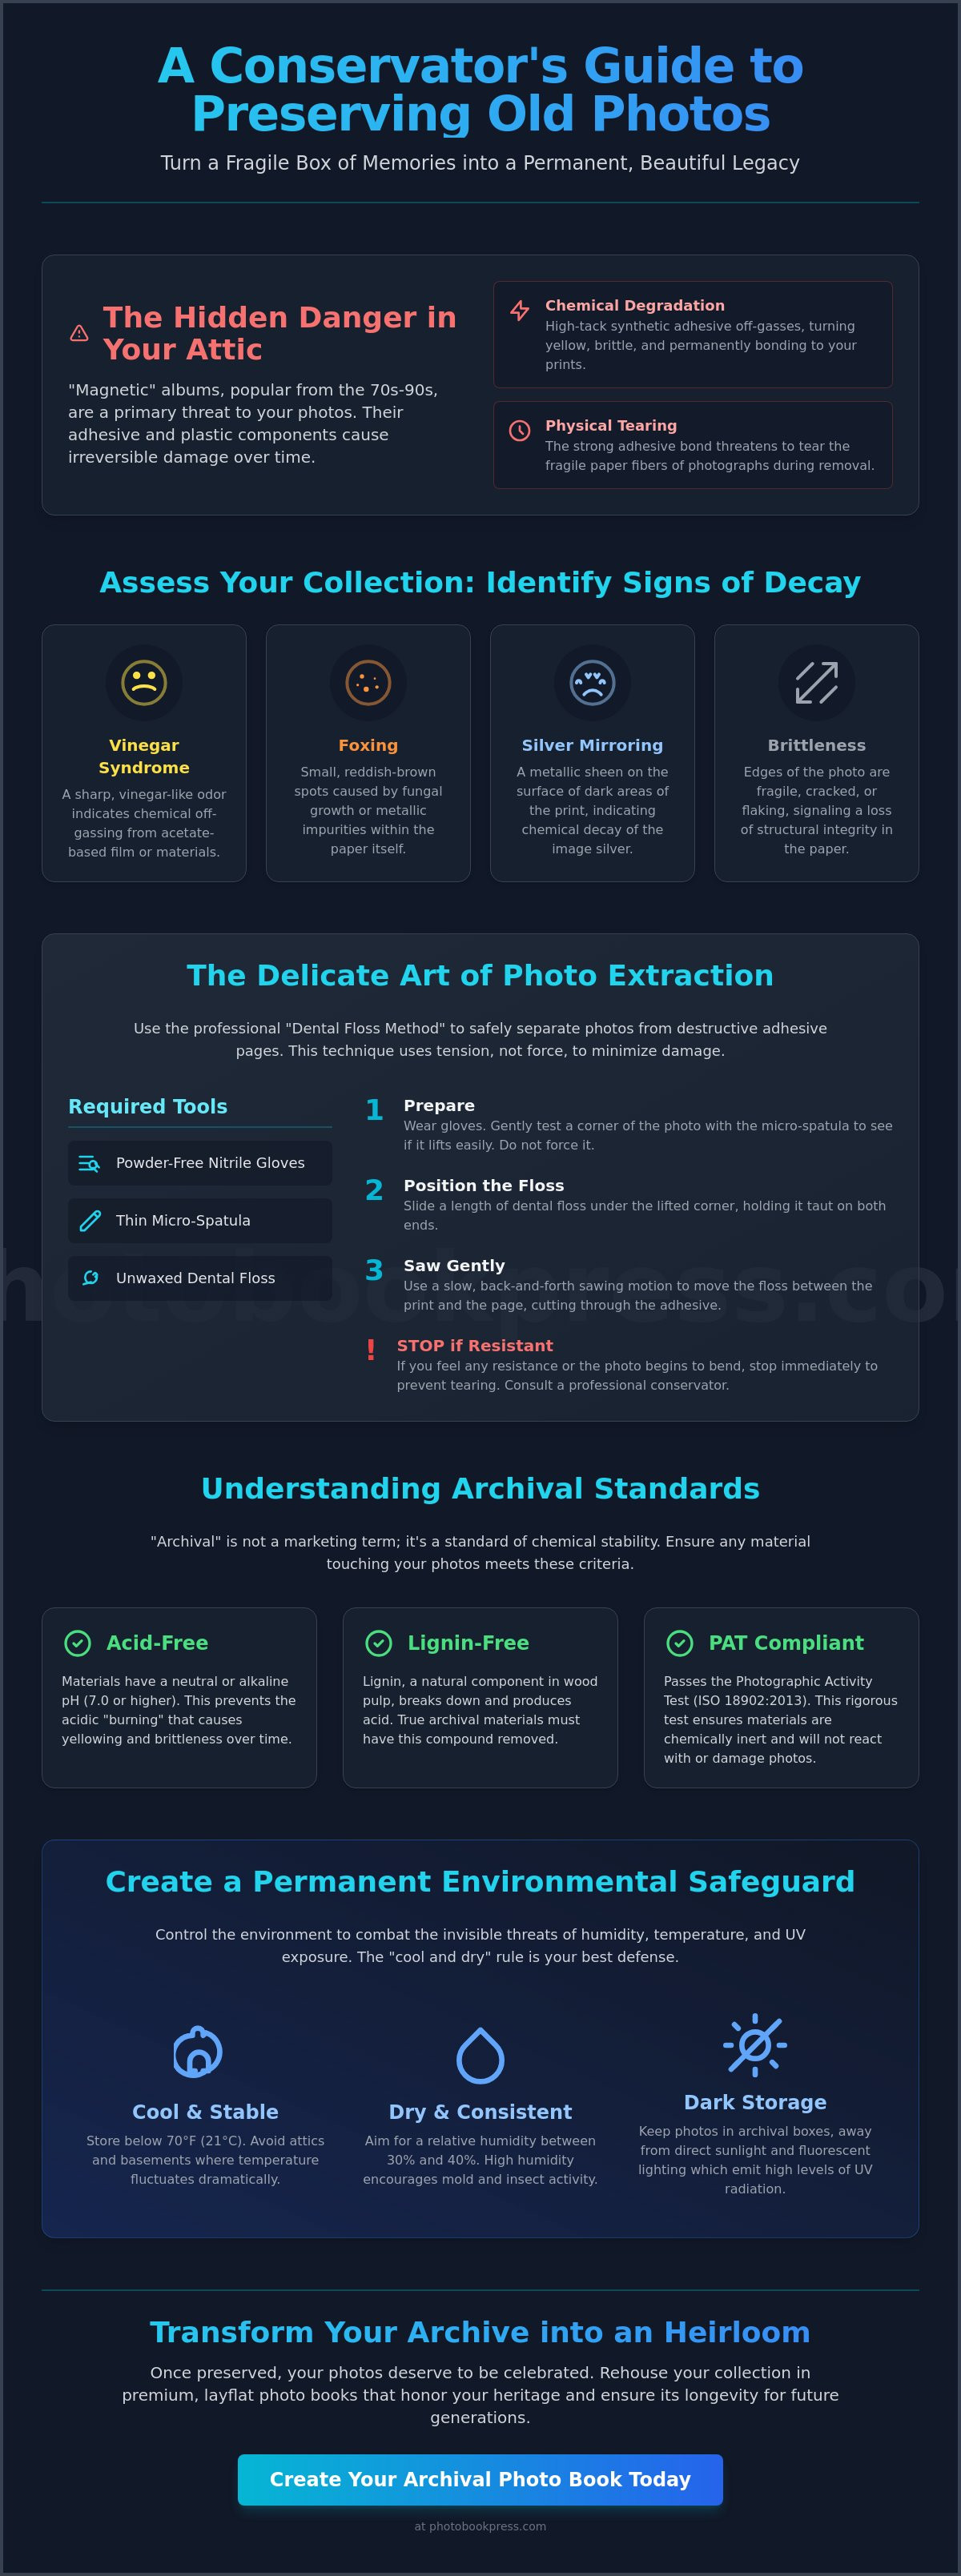
Opening an inherited album is an intimate experience, yet the physical state of those pages often reveals a silent crisis. Many families still house their history in "magnetic" albums popular from the 1970s through the 1990s. These products use a corrugated cardboard base coated with a high-tack synthetic adhesive and a plastic overlay. Over time, that adhesive undergoes a chemical shift, creating a permanent bond that threatens to tear the paper fibers of your prints. Understanding these risks is the essential first step in learning how to preserve old photos in an album before the damage becomes permanent.
Beyond the adhesive, look for sensory cues of active deterioration. A sharp, vinegar-like odor suggests "vinegar syndrome," indicating that acetate-based materials are chemically off-gassing. You may also see foxing, those small, reddish-brown spots caused by fungal growth or metallic impurities within the paper. Identifying these markers early allows you to prioritize which pieces of your heritage require immediate care. Check for silver mirroring, a metallic sheen on the surface of the print, and evaluate the edges for brittleness that suggests the paper is losing its structural integrity.
To better understand the nuances of archival care and assessment, watch this expert overview:
Vintage photo mounts and backing papers often contain lignin. This natural component of wood pulp produces acid as it degrades, effectively "burning" the photograph from the inside out. This process results in the yellowing and brittleness common in nineteenth-century portraits. True archival materials must be acid-free and lignin-free to prevent these reactions. Investing in high-quality housing is a core tenet of the conservation and restoration of photographs, ensuring that your storage choice doesn't become a catalyst for decay. "Archival" isn't a mere marketing term; it's a standard of chemical stability that protects your investments in legacy.
Managing a vast family archive requires a disciplined triage system. Categorize your collection by physical urgency rather than just sentiment. Critical items include those with active silver mirroring or those showing signs of extreme brittleness. Stable prints might simply need a more refined environment to ensure they stay that way. As you sort, maintain the provenance of each image. Documenting the "who, when, and where" on the reverse of a safe sleeve ensures the narrative remains intact. This methodical approach transforms a chaotic box of memories into a structured, protected legacy, making the process of learning how to preserve old photos in an album much more manageable.
Rescuing a photograph from a decaying "magnetic" album requires the steady hand of an artisan and the patience of a curator. Before you begin the physical intervention, assemble a workspace that reflects the value of the history you're handling. You'll need powder-free nitrile gloves to protect the emulsion from skin oils, a thin micro-spatula for gentle lifting, and a spool of unflavored, unwaxed dental floss. This process is a critical phase in learning how to preserve old photos in an album, as the goal is to break the chemical bond without stressing the fragile paper fibers.
The "floss method" is the gold standard for removing prints that have become one with their adhesive backing. Gently slide a length of floss under a corner of the photograph. Using a slow, back-and-forth sawing motion, move the floss between the print and the page. This technique uses tension rather than force to sever the adhesive bond. If the photo resists, stop immediately. Applying heat from a hair dryer on a low setting can sometimes soften the glue, but this carries risks. It's often safer to consult the guidelines to Preserve Family Archives provided by the National Archives for more complex conservation challenges.
Once the print is free, you may find residual adhesive clinging to the reverse side. Avoid using chemical solvents or "goo removers" that can leach into the paper. Instead, use a soft hake brush made of goat hair to sweep away loose dust and debris from the surface. If the adhesive remains tacky, place a piece of acid-free glassine paper against the back of the photo to prevent it from sticking to new housing. This meticulous cleaning ensures that your artifacts enter their new home in the most stable condition possible.
Proper handling is a learned skill. Fingerprints are more than mere smudges; the salts and acids in your skin can cause permanent staining on silver-halide prints over time. Always grip a photograph by its edges or use a rigid support like a piece of archival board to move it. If a print feels brittle or begins to flake, it has reached its limit for DIY extraction. Recognizing when to pause is an act of respect for the medium. If you're looking for a way to display these delicate memories safely, consider creating custom notebooks to document the stories behind the images while the originals rest in a controlled environment.
Digitization serves as your primary safety net. Always capture a high-resolution scan at a minimum of 600 DPI before attempting to remove a photo from an old album. These "digital negatives" preserve the image's current state regardless of what happens during the physical extraction. High-quality digital files also allow you to bridge the gap between fragile originals and modern displays. You can use these restored images to design professional photo books, which offer a sophisticated, archival-grade way to share your family’s narrative without risking the original prints. This dual approach ensures your legacy is protected both physically and digitally for the next century.
Once you've safely extracted your prints, the focus shifts to the chemical integrity of their new environment. Selecting the right materials is a technical discipline that separates a temporary scrapbook from a permanent heirloom. The gold standard for any storage material is passing the Photographic Activity Test (PAT), detailed in ISO 18916:2007. This test ensures that the paper, plastic, or adhesive won't cause staining or fading when in direct contact with a photograph. It’s a rigorous benchmark that provides peace of mind for those learning how to preserve old photos in an album.
When choosing protective sleeves, the choice of plastic is paramount. Polyester, often known by the brand name Mylar, offers the highest level of clarity and chemical stability. It's the preferred choice for curators who value long-term rigidity. For larger collections, high-density polyethylene or polypropylene are acceptable alternatives, provided they're free of plasticizers. These materials act as a physical barrier against pollutants while allowing the tactile beauty of the print to remain visible. For more nuanced advice on enclosures, the Library of Congress guide to photo preservation offers a definitive look at professional-grade housing.
The paper used in your album also requires scrutiny. Most vintage prints benefit from buffered paper, which contains a small amount of calcium carbonate to neutralize acids that may develop over time. However, certain processes, like cyanotypes or blueprints, require unbuffered paper to prevent color shifts. This level of detail ensures your curation process is as scientifically sound as it is aesthetically pleasing. Modern innovations like layflat photo books further enhance preservation by eliminating the traditional gutter. This design prevents the physical stress and "gutter-wear" that often leads to cracked emulsions in standard bound volumes.
The longevity of a modern album depends on the invisible details of its construction. Archival-grade adhesives are essential to prevent the "off-gassing" that yellowed the albums of the past. When reproducing old photos, pigment-based inks provide superior lightfastness compared to standard dye-based options, ensuring that the vibrancy of the image lasts for generations. Encasing these prints in premium covers of top-grain leather or natural linen provides a resilient, breathable shield against the elements.
The most dangerous threat to a collection is often found in the "big box" store aisles. Avoid any album containing Polyvinyl Chloride (PVC), as it releases hydrochloric acid that will destroy a photo in years, not decades. Similarly, never use rubber bands, standard office tape, or paper clips. These introduce sulfur and physical abrasions. Don't be misled by "self-adhesive" claims in modern albums; if a page feels sticky to the touch, it's likely a repeat of the magnetic album disaster. True preservation relies on physical mounts or archival corners that allow the photograph to breathe without being permanently bonded to its housing.
Stabilizing your collection is only the first step in the journey of stewardship. The true transformation occurs when you transition from passive storage to active curation. Learning how to preserve old photos in an album is as much an artistic endeavor as a scientific one. It requires you to look at your collection not as a series of disconnected events, but as a cohesive narrative that deserves a gallery-quality presentation. By moving beyond simple preservation, you elevate a box of loose prints into a curated work of art that invites engagement and reflection.
When deciding the flow of your new album, consider the difference between a rigid chronology and a thematic arrangement. While a timeline offers a logical progression, a thematic approach allows you to group memories by emotional resonance. You might dedicate a section to "The Architecture of Childhood" or "Travels Across the Atlantic." This method highlights recurring motifs in your family’s history that a simple date-order might obscure. Regardless of the structure, the power of whitespace cannot be overstated. Giving a single, striking portrait room to breathe on a page honors the individual's presence and prevents the visual clutter that often plagues traditional scrapbooks.
A sophisticated legacy project also embraces the context surrounding the image. Safely incorporating ephemera, such as a handwritten letter or a vintage theater ticket, adds a tactile layer to the story. These items should be scanned and reproduced or placed in archival sleeves to prevent them from touching the original prints. You can find detailed strategies for balancing these elements in our photo book design guide, which explores the intersection of traditional craft and modern layout.
Visual harmony is essential when mixing various photographic mediums. You can achieve a polished look by balancing high-contrast black-and-white shots with the warm, muted tones of sepia prints. Don't forget to capture the hidden stories; scanning the backs of photos to include a relative’s handwritten notes on the opposite page preserves the provenance as clearly as the image itself. For wide family portraits, use panoramic spreads that span the fold, ensuring no detail is lost in the binding.
The physical vessel for your history should mirror the weight of the memories it holds. Leather-bound albums offer a timeless, stately presence ideal for genealogy projects and family bibles. For collections featuring wide-format group shots, layflat books provide a seamless viewing experience without a disruptive center gutter. If your narrative is more casual or intimate, the organic texture of a linen cover provides a sophisticated yet approachable tactile appeal. To begin your own curation project, you can design your legacy album using our premium artisan materials.
Once your photographs are rehoused within a premium volume, the final stage of stewardship begins. Environmental equilibrium is the silent partner of archival safety. While professional vaults maintain industrial standards, you can achieve a similar level of protection at home by adhering to the "cool and dry" rule. Aim to keep your collection in an environment where the temperature remains below 70 degrees Fahrenheit and the relative humidity stays between 30% and 50%. These conditions inhibit the chemical reactions that cause yellowing and prevent the growth of mold that can devastate an entire collection in a single season. Mastering these variables is the definitive answer to how to preserve old photos in an album for the long term.
Light remains the most aggressive catalyst for decay. Ultraviolet rays act as a persistent bleach, breaking down the molecular structure of both silver-halide and modern pigment-based prints. To safeguard your work, store your albums in a dark, enclosed cabinet when not in use. When you do display your wedding album or family history, ensure it remains away from direct sunlight or harsh LED sources. Physical orientation also matters. Large, heavy volumes should be stored horizontally to prevent the weight of the pages from pulling against the spine. Smaller books can rest vertically, provided they're supported by adjacent volumes to prevent warping.
Disaster preparedness is the final layer of your curatorial discipline. Protecting your physical legacy from floods and fire requires proactive placement. Store your collection at least six inches off the floor to mitigate damage from minor leaks. If you live in a high-risk area, consider housing your most critical heirloom volumes in water-resistant, archival-grade storage boxes. These secondary containers provide a crucial buffer against environmental shocks and physical impact.
The most common preservation errors occur in the attic and the basement. Attics are notorious for extreme heat fluctuations that accelerate the chemical breakdown of paper fibers. Conversely, basements present a constant threat of humidity and water damage. A single pipe leak or a humid summer can introduce irreversible foxing. The safest place for your collection is a climate-controlled living area. A bookshelf in a bedroom or a study provides the stable temperature and airflow necessary to keep your prints in peak condition.
In our increasingly digital-first world, the physical print remains the only medium that doesn't require a device to be understood. It's a tactile connection to the past that data alone cannot replicate. True preservation includes teaching the next generation how to preserve old photos in an album through proper handling and storage. Explain the importance of clean hands and the science behind the materials you've chosen. By sharing the "key" to their care, you ensure the narrative continues. When you're ready to transform your loose collection into a permanent work of art, you can commission your archival legacy album with Photobook Press. Your family’s history is a masterpiece; it deserves the protection of artisan craftsmanship.
The journey from a fragile, adhesive-bound past to a curated future requires both technical precision and a deep respect for the medium of print. By mastering the science of archival materials and the art of narrative design, you've moved beyond mere storage. You're now a steward of history. Understanding how to preserve old photos in an album ensures that the faces and stories of your ancestors don't just survive; they thrive in a format that honors their significance. This transition from a box of loose prints to a hand-crafted volume is the ultimate act of family devotion.
At Photobook Press, we've been hand-crafting these vessels of history in Maryland since 1985. Our process utilizes museum-grade archival papers and pigment inks to guarantee that your legacy remains vibrant for generations. Our signature layflat binding offers a stress-free viewing experience, protecting every image from the physical strain of traditional gutters. Begin crafting your archival heirloom album with Photobook Press today. Your history is a work of art, and it's time to give it the home it truly deserves.
Use unflavored, unwaxed dental floss to gently saw between the photo and the adhesive backing. If the bond feels too strong, stop immediately to avoid tearing the paper fibers. This delicate method is the safest way to begin learning how to preserve old photos in an album without risking the physical integrity of the original print.
A premium archival album is generally superior because it facilitates narrative curation and safe viewing. While archival boxes offer protection, they often result in forgotten memories tucked away in dark corners. A well-constructed layflat album allows you to share your history while keeping prints stabilized and shielded from environmental pollutants and frequent physical handling.
Acid-free indicates that the material has a pH of 7.0 or higher during production, which prevents the chemical "burning" that causes yellowing over time. For maximum durability, ensure your materials are also lignin-free. These benchmarks guarantee your storage environment won't introduce corrosive elements that degrade the delicate structure of your vintage collection over the coming decades.
You should never use standard office tape or household glue. These products contain sulfur and acidic compounds that lead to permanent staining and brittle edges. Use only archival-safe photo corners or pH-neutral adhesives that have passed the Photographic Activity Test (PAT). This ensures your prints remain secure yet undamaged for future generations of curators.
Look for yellowing, brittle edges, or a sharp, vinegar-like scent. These are clear indicators of chemical decay and active off-gassing within the book. If the pages are tacky or prints are fused to the plastic overlay, the album is failing. Recognizing these symptoms is vital when determining how to preserve old photos in an album that offers true museum-grade protection.
Powder-free nitrile gloves are the preferred choice for handling fragile artifacts. They act as a barrier against the natural oils and salts on your skin that cause permanent staining or silver mirroring on the emulsion. If gloves aren't available, handle the prints strictly by the edges with freshly washed, thoroughly dried hands to minimize any direct contact.
The ideal environment is a consistent temperature below 70 degrees Fahrenheit with relative humidity between 30% and 50%. Avoid the extreme fluctuations typical of attics or basements. A stable, climate-controlled living space provides the best defense against accelerated chemical breakdown and the threat of fungal growth within your most precious heirloom volumes.
Newspaper is highly acidic and should never directly touch a photograph. The safest method is to scan the clipping and print it onto archival paper or house the original in a dedicated polyester sleeve. This prevents lignin and acid from migrating to your prints, ensuring the surrounding memories remain pristine and unaffected by the newsprint's rapid decay.